Planning tools in plans
This page refers to the advanced planning features that are only available as part of Jira Cloud Premium and Enterprise.
Plans come with tools specifically designed for long-term planning that don’t exist elsewhere in the Jira ecosystem.
Roll-up values
Parent issue and child issue are relative terms used to refer to higher-level issues that contain smaller tasks. This concept scales to any hierarchy level:
an initiative (parent issue) that contains epics (child issue)
an epic (parent issue) that contains stories (child issue)
a story (parent issue) that contains subtasks (child issue)
In this documentation, we use initiative, epic, and story in examples to refer to hierarchy levels based on Agile best practices. However, in Jira these labels can be configured by your administrator.
A big problem for planners is that what you plan isn’t always what ends up happening. Instead of forcing you to manually update values of parent issues, you can tell your plan to infer values of parent issues based on those of the child issues. This is referred to as a roll-up.
From the View settings menu on your timeline, choose either option to infer a value:
Dates - includes start and end dates. Read more about how your plan rolls up dates
Others - includes estimation values, releases, sprints, and teams. Read more about how your plan rolls up estimates
Rolling up dates is a calculation that only exists for planning purposes in your plan. When you commit changes back to your Jira issues, these rolled-up values aren’t saved and the date field of your issue will be empty.
For example, let’s look at the screenshot below:
The top level issue is an epic, and contained within are three stories. With rolled up values enabled, your plan automatically picks the earliest start date and the latest end date of the child issues, then applies them to the parent issue. This way, if the child issues get rescheduled, delayed, or removed from your plan (which happens; no judgement), the values of the epics automatically reflect this and keep your plan on track.
Warnings
Your plan highlights places where it thinks there are errors such as issues that are missing sprint assignments or off-track dependencies, and more. These are referred to as Warnings.
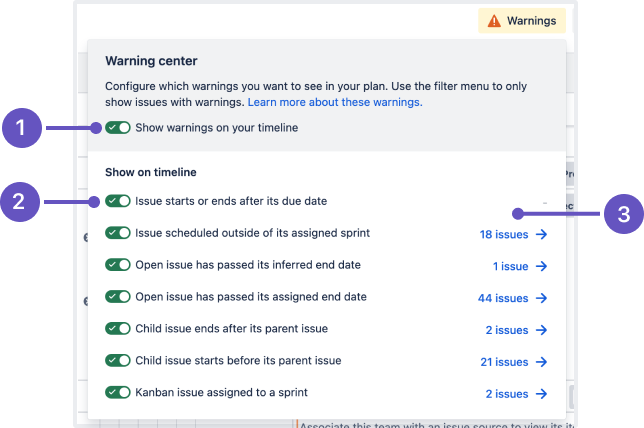
To view all them, select the Warnings button at the top of your plan. When you do, you’ll see a window that looks like this:

Turn all warnings on or off using the Show warnings on your timeline toggle.
Use the toggle next to the individual warnings to hide them on your timeline.
View a list of the issues affected by each warning type.
Auto-scheduler
Your plan can automatically schedule issues for you based on any information that you’ve already added like issue estimations, scheduled issues, dependencies, release and team assignments, and more. From here, you can either commit the plan as is, or use it as a starting point to make further edits.
Capacity and velocity
Capacity and velocity are two features that help you create efficient but achievable plans.
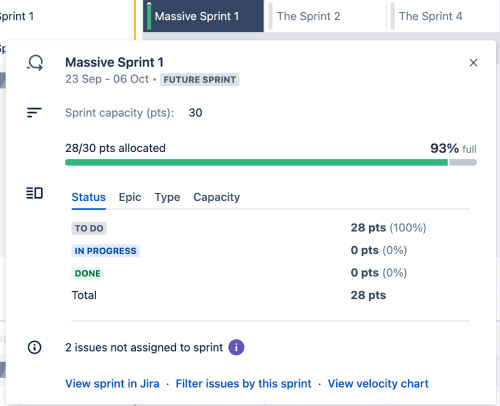
Capacity in your plan refers to the number of story points or hours your team can complete in one iteration. For example, a team with a capacity of 30 story points (which is the default setting) can contain six issues that are estimated at five story points each during one iteration.
Velocity, which only exists within your plan, is your team’s average capacity per iteration over time based on past performance. For example, a team with a velocity of 30 story points will require two sprints to complete an epic estimated at 35 story points, assuming no other work was already assigned to those sprints.

Together, these two features ensure that your plan is realistic based on how quickly your teams are able to work.
Further reading:
Learn more about the auto-scheduler
Was this helpful?